|
|
|
-
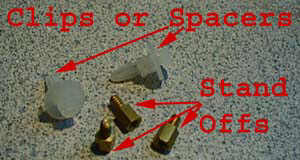
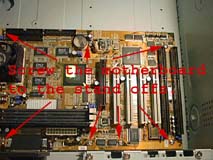
If your case uses clips (or spacers) then you should probably remove those and install
stand offs (the screw that has a male on one end and female on the other), they seem to work much better than clips.
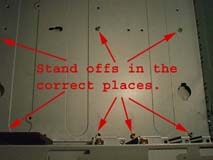
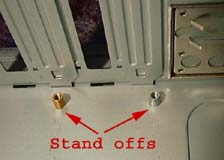
Place the stand offs wherever the new motherboard has screw holes (to find out set the board in the case to see what holes line up).
|
|
Installing A Processor
-
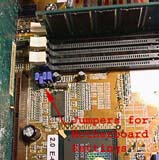
If your motherboard has jumpers use your manual to make sure you have the appropriate settings for your processor and
RAM and other options.
|
|
-
Examine your processor, make sure it doesn't have any bent pins (If its a socketed processor).
|

|
-
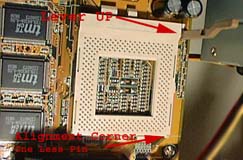
Install it by gently placing it on top the socket. Make sure the lever is UP on the socket.
There should be an alignment corner on the CPU which lines up with a corner on the socket on the motherboard.
|
|
-
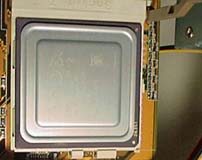
Make sure the processor fits down snug, it should be loose but down all the way. Pull the lever DOWN and snap the lever into place. This should
lock the processor.
|
|
-
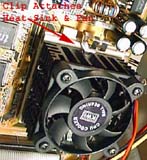
Attach the heat sink and fan to the processor. Usually it clips on, this can be kind of tricky. Which is why you should attach it before you place
the motherboard into the chassis.
|
|
|
|
|
-
Now set the motherboard on top of the standoffs w/ the holes lined up and screw the motherboard into the standoffs. Don't over tighten the screws,
you could break the motherboard.
|
|
-
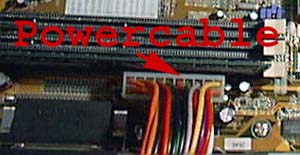
Attach the power cable to the motherboard.
Attach the power to the fan
|
|
-
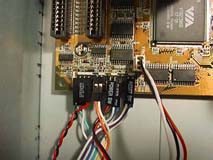
Attach the lights and power/reset switches to the appropriate places per your motherboard manual.
(Polarity only matters on LED connectors not on Switch connectors or speaker
connectors.)
|
|
-
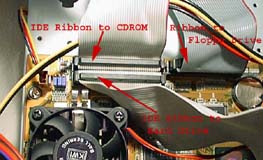
Attach the IDE ribbons. Usually your main hard drive would attach to the Primary IDE connector, and your
CD ROM would attach to your Secondary IDE connector. (Or you could connect two devices on one ribbon, i.e. a
hard drive and a CD ROM.)
Attach the smaller floppy drive ribbon to the floppy drive connector.
Older style motherboards may require ribbons for the mouse, printer, and serial ports.
|
|
-
There are two ways you can proceed now:
-
Install all your cards, (i.e. video card, sound card,
modem, and other cards that you have). Then test the computer.
OR
-
Install only your video card and then test the computer.
|
|
-
Before you put the outside cover on the chase, test your new computer, by plugging in the power cable,
the monitor cable, keyboard, and mouse.
Make sure your monitor is on then turn on your PC. Don't touch inside the case when the computer is running.
When the PC boots up watch the monitor to make sure words appear on the screen, first should be your video bios
message (this is quite fast), and second is your motherboard bios message, it will count your memory at this time
make sure it counts the right amount. If you need to go into bios setup for any reason now is the time to do that.
Lets assume for now that it booted up and everything was fine. If you are having problems see troubleshooting below.
When you load into MS Windows (or other OS) it should begin detecting new hardware. It will probably ask you to reboot
several times, make sure you have your MS Windows CD handy.
If you didn't install all the cards, shutdown the PC through the operating system when you get the chance. Unplug your
PC and install the cards. Plug in anything else (i.e. printers, scanners, speakers) and turn the system back on.
Skip Toubleshooting?
|
Troubleshooting
-
Computer could be heard coming on, but beeps were heard or not heard, but nothing came on the monitor.
-
Make sure the monitor is on, and that it is plugged into the video card.
-
If you decided to put all your cards in your computer and nothing appeared on the screen during the your test
then turn off the computer (you might have to pull the plug LITERALLY). Then unplug the computer, remove all the
cards except your video card, and check your jumper settings (if your board has jumpers), chance are they are
incorrect.
-
If you only had your video card in, or the problem still occurs, again turn off and unplug the computer.
Check all the jumper settings (yes check them again, and again.) Many times this is the problem and a jumper
just wasn't sitting right.
-
If the problem continues (you still don't have anything at all showing up on the screen when you hear the computer
turn on), then remove the IDE cables and floppy drive cable from the motherboard. Try turning it on again.
-
Problem continues? Try reinstalling your RAM. Also try reseating the processor,
be careful not to apply to much pressure when removing the heat sink / fan and CPU. Make sure that the PC is NOT plugged in
while you are reseating or reinstalling components.
-
Still have a problem? At this point you should have only a bare system put together. The motherboard should have the
power cable plugged in, video card installed, CPU in, heat sink/fan attached to CPU, and at least the power switch
cable (from the front of the case to the motherboard) attached. You can pull off all other indicator lights and reset
switch cable. If you have other compatible parts, like RAM, CPU, or Video card, you should try swapping out parts
to determine what is wrong. Make sure all parts that you swap are compatible or you could damage both the parts you
were swapping in and the motherboard.
-
Computer could not be heard coming on. (i.e. No fans came on, no power up sounds, no beeps.)
-
Make sure that the computer is plugged in. Sometimes there is a power switch in the back of the computer this needs
to be in the on position. Also make sure that the power switch cable is attached to the correct spot on the motherboard.
Try turning it on again. If it still fails to come on try flipping the power switch
cable over and plug it in again.
Sometimes the labeled side of the connector faces down (away from you), sometimes up (toward you).
|