|
Installing your Drive
|
- Make a backup. Anytime before swapping in and out drives you should make a backup of important information.
- Shut down the system, unplug the power cord.
- Take the case off.
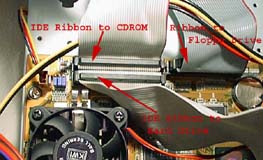
- Notice where the IDE ribbons are running. Notice which IDE ribbons connect to which devices. If replacing a hard
drive unplug the hard drive that is going to be removed. Unplug both the power cable and the IDE cable.
|
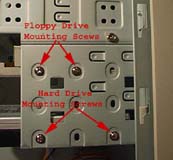
- Remove the screws holding the drive in place and slide the hard drive out of the back of the bay.
|
|
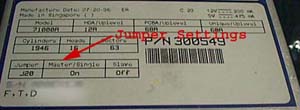
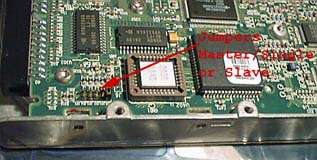
- Your primary hard drive is usually a master or single drive and rarely a slave drive. Note what the previous drive was set
to before and set the new drive to these same settings. This is not necessarily the same jumper placement see
your hard drive manual, or a label on the hard drive for appropriate jumper settings for your hard drive.
|
|
- Insert the new drive into the bay and screw it into place with four screws.
(Two on each side.)
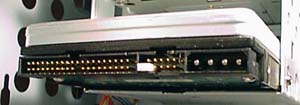
- Plug the IDE ribbon in and the power cable in. Ninety percent of the time the red line on the IDE ribbon should be right next
to the red wire on the power cable. (I have encountered drives where this wasn't the case.) The red line indicates pin 1, so see pin 1 labeled on the IDE plug make sure that matches up with the red line on the IDE ribbon.
|

|
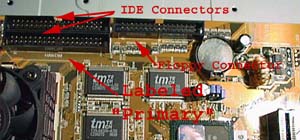
- Make sure the IDE ribbon is plugged securely into the motherboard. Again the red line on the IDE ribbon should match up with
pin 1. Usually your main hard drive's IDE ribbon is plugged into the Primary IDE plug-in on the motherboard. This should be
labeled "PRIMARY" or "PRI" or "1".
|
|
- Plug your system back in and turn the system on. Make sure during the boot up
sequence that it detects all IDE devices that it
should.
- If all IDE devices were detected correctly go ahead and put the case back on.
|
Formatting A Hard Drive
Warning Follow at your OWN risk!
- Now we need to format the drive. If this is the only drive in your system you will have to boot off a floppy or off a CD. The
latter is becoming the more preferred choice and most newer motherboards can do this.
- Windows 98 will configure your hard drive for you, but I recommend that you do it your self.
Boot up off a floppy or CD ROM and then exit to the Dos prompt. You should be able to type FDSIK when you get there, but you
might have to change directories. If you boot up off the MSWIN98 CD then it will make a RAM disk and you might need to change
to that drive to run FDISK. (Obviously there are other operating system choices, but I am using the most popular for an example.)
FDISK will ask you if you want to enable large disk support. Say yes.
Then you want to create at least two partitions on your hard drive. WARNING this will erase everything on your hard drive
so only do this if its a brand new drive.
Create your first partition, your C partition, as a smaller partition, 2 or 3 gigs at most. Then the remainder can be your D
partition. You can create more if you wish, I just find that 2 partitions with a smaller C make things work better.
- One you have your partitions the way you want exit FDISK and reboot off the CD or Floppy and install your operating system.
|